So the other day as I was waiting for my mirror to be cut, I went browsing in other stores till it was finished. I went into a store and they had this great looking rectangular box. It was angled to almost look like a trough. I loved it, but it was 50.00. I am redoing somethings in my bathroom and thought it would be cute to put things like soaps towels, etc. I cannot afford to spend $50.00 on a box. I was working on my cabinet drawer fronts and went down in garage for some finishing nails and found these three pieces of wood. I am not a carpenter, but I figured why not give it a try. I started by using some wood glue and then using three screws to attach each piece. (Yes I know its not the fancy way. For those of us with really no skills, it works). I then was trying to see what I had for the sides and found 2 wooden rulers. I just cut them in half and attached with wood glue and finishing nails. I then painted it with paint in my garage, 2 coats. When it dried I sanded the edges and around that knot in the wood. Then I applied finishing wax and after letting it sit 15 minutes I buffed it with a towel (One that does not leave lint). There you go free wooden box. Now is it as nice as the 50.00 one, no. But I love the way mine turned out and even better, free
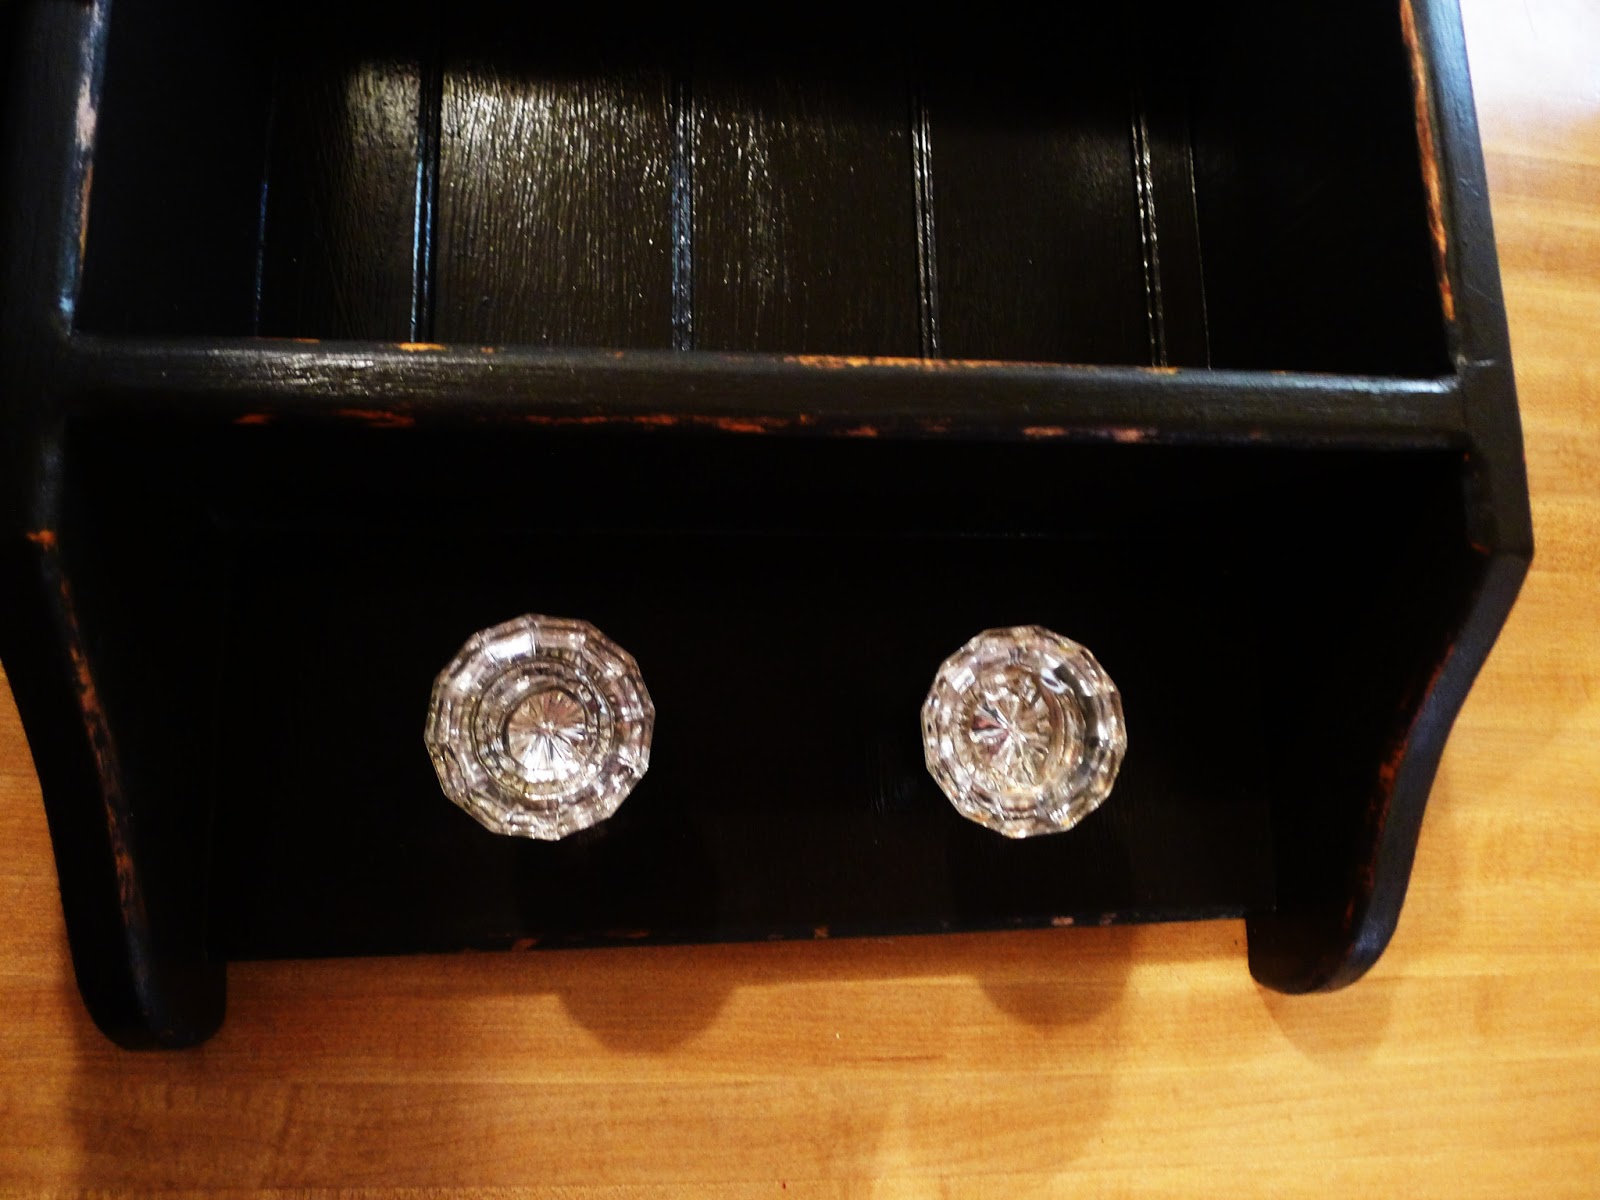
I was at an antique shop with my hubby and there was this really cute medicine cabinet. They wanted $150.00. That is way out of my budget. I came up with this idea with mostly items I already have. (Sorry I didn't take step by step pictures). I had one of those 1980's oak wall shelves. Still in great condition, but very oak. I also had a gold frame in garage, that was not a pretty shade of gold. 1st step: I cleaned and lightly sanded both. 2nd step :I used some paint leftovers in my garage. The paint I used was a paint in primer all in one. let it dry over night. 3rd step: I lightly sanded the edges. basically I did this a total of 3 times so it would really look antique with the layers of paint. 4th step: I used a stain marker to go over the areas were the wood was showing through and wiped away the excess with a towel. 5th step: I applied a finishing wax and let it sit for at least 15 minutes. Then I buffed with a cloth (one that wont leave lint). Let it sit over night Step 6: repeat step 5. Step 7: I took the frame to my favorite framing shop and they cut the mirror and they applied the epoxy added some foam board and the teeth insets to hold into place. They only charged me $5.50. Step 8: I attached 2 hinges, cost was $2.70. I also added a magnetic catch to hold the door closed, cost $1.00. step 9: I added a crystal door knob, cost was $3.50. Step 10: added two crystal door knobs where the 2 wooden dowels used to be, cost for set was $12.00. I loved how it turned out. I love victorian frames but would work great with a simple frame also. Total cost $24.70
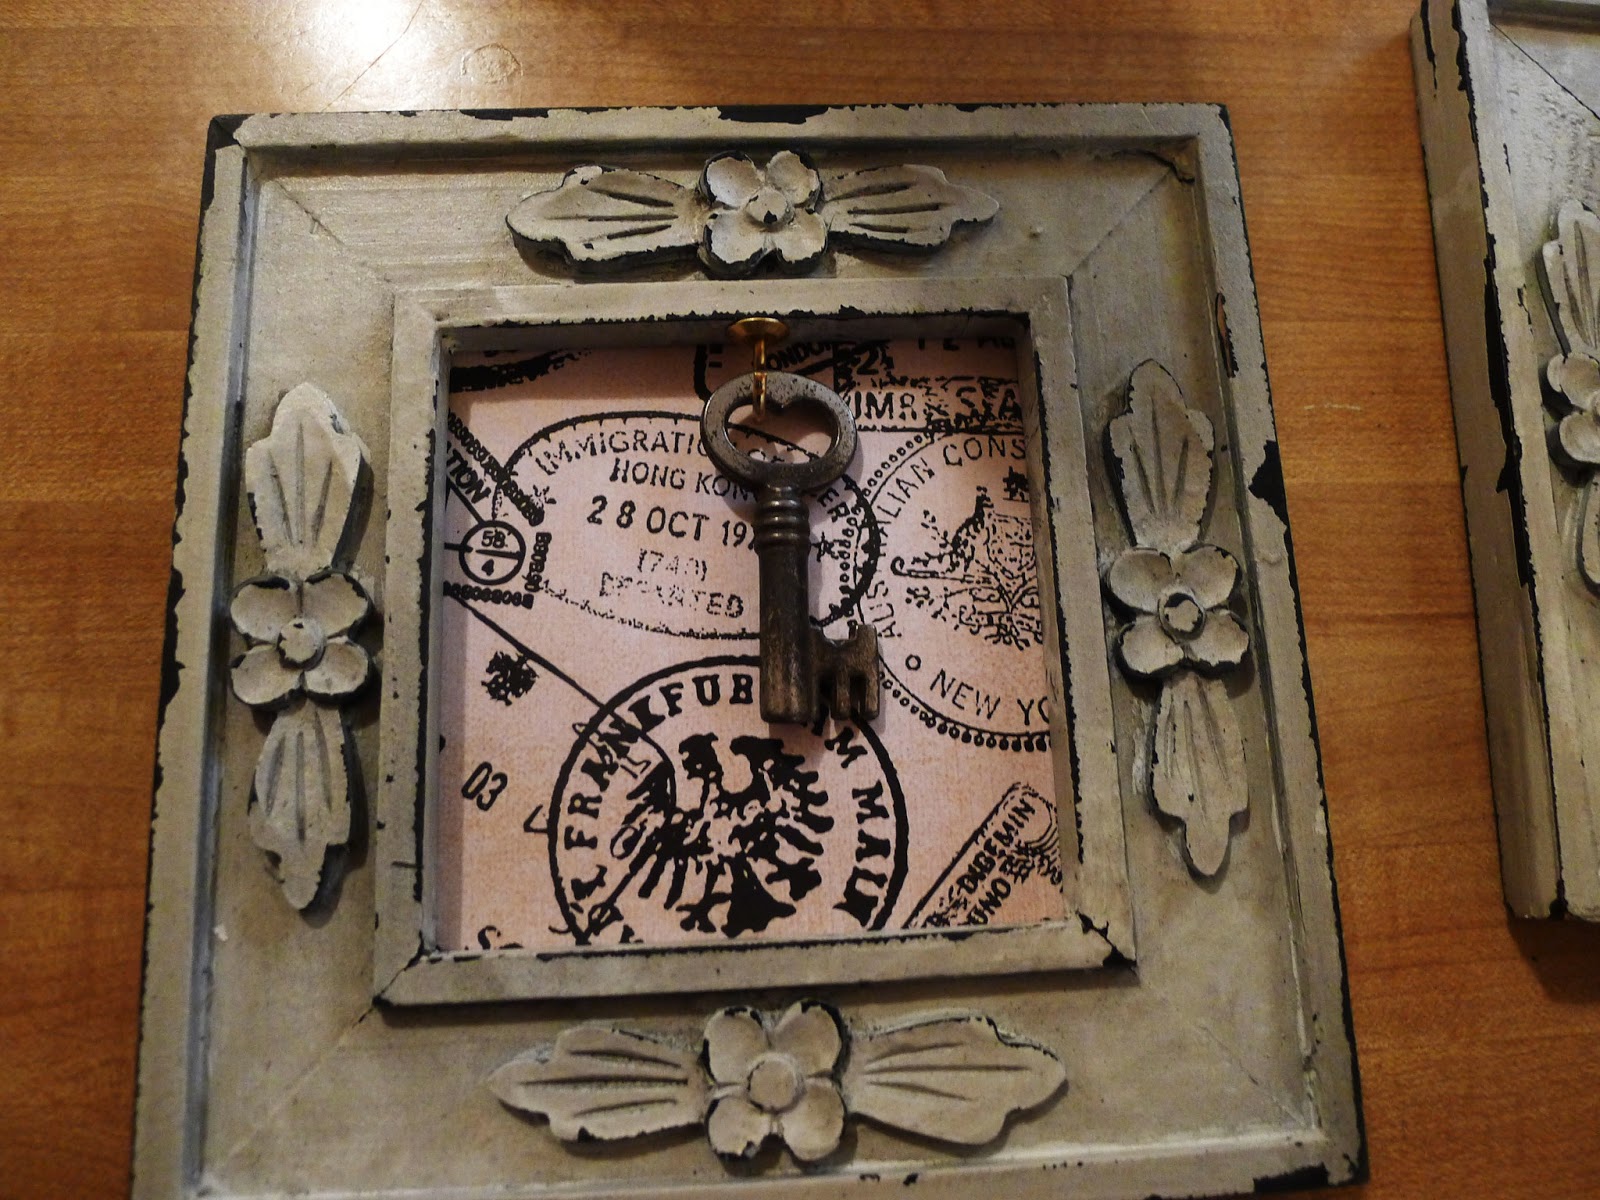
If you are as forgetful as I am you need to be organized. That's why I made this key rack. All these materials are things I have had for years so no new money was spent. I started with these small decorative frames. I ended up only using the two. I added three hooks on the bottom of each. If you don't like the color of the hooks just spray paint. I added a small hook at the top inside of the frame. cut some scrapbook paper to fit. Added an old key I had on the small hook. added a a tooth hanger on the back. To keep stationary from the weight of the keys I added the double sticky squares on each corner on the back to keep in place when a set of keys is removed. Easy as that.
This is the easiest project ever. I didn't take step by step pictures because I just got to it and forgot. This piece of wood was sitting in my garage. It measures 27 X 6 and 1 inch thick. I have had these hook for years bought for .50 at a garage sale. I painted the wood with a green craft paint. I then did streaks with a dark brown paint, just to give it depth. I then painted another thin layer of green paint. Then I just attached the hooks with screws. Just like that it's done. Total cost 50 cents
I have small wall space in my kitchen so a traditional calendar does not fit. I decided to wing it and make my own with items mostly found already in my house. I always have a stash of frames that I by at garage sales. This one was perfect because the wall I needed to hang my calendar on is about 10 inches wide. The frame was already painted black so I left it alone. I went to the craft store and purchased this dark brown cork. It is thick and heavy duty. I used a coupon and it comes in a pack of four so If I need to use the rest for something else I can. I purchased this basic wood frame for $1.00 and painted it a off white craft paint I already had. I cut the cork easily to fit and then had a space of 2 inches left, so I used the left over piece and covered it with some remnant fabric and just adhered it with my staple gun. I used jewelry metal that was on clearance for $2.00. Its easy to cut with just a pair of old scissors. I found some alphabet tiles that already had a small hole at the top, also used a coupon. I attached the metal pieces with just push pins, They are easy to cut if you have a metal cutter so you don't have a pin hanging out the back. then I used a pair of pliers to bend up my pins to make them like a hook. to attach the wood tiles. I used some scrapbook paper I already had to separate the days and numbers. Obviously I just wrote the numbers on the back of the alphabet wood pieces. Just added one of my own pictures in the frame which is easy to change out each month. altogether I spent $7.70.
I have always loved Victorian detail, but live in a house built in 1974. I realize my style is very eclectic and over the top grandma. Come on, who doesn't love their grandma. I had been looking online for a ceiling medallion and the cheapest I could find was $30.00 for really plain ones. I was in a consignment shop and guess what was sitting there waiting for me to buy. I talked the lady down to $10.00. I had to cut a hole for the light fixture. Yes I cannot cut anything straight, but its okay. It will be covered by the light fixture. I used paint I already had in my garage. I started out with a creamy white latex paint. Let it dry while working on another project. Now mind you I am not a painter and was winging this and hoped for the best. With a partially steady hand added black latex paint on the detail. Let it dry for a bit. I then added a gold craft paint and just dabbed it everywhere to give it some depth. I then added some white craft paint to fix what I didn't like. Finally I added a glossy coat of spray gloss. I think it turned out not to bad for a newb. can't wait to put it up in the kitchen.
I wanted to have a page that is dedicated to projects and other misc. interests. I have been trying to get my home the way I have wanted it for years. I just never made it a priority. After a very difficult year I needed to refocus my life in a way that gave me meaning and joy. I have been surrounded by some amazing people that have re-entered my life, new friends and others that have been with me throughout a lifetime. Each of these great people are inspiring me to reach new goals and open myself up. Anyways enough of the mushy stuff for now. I will be posting pics of old and new projects.